Android Custom ListView (Menambahkan Gambar, sub-judul)
September 10, 2020
Add Comment
Setelah membuat ListView sederhana, android juga menyediakan fasilitas untuk menyesuaikan ListView kita.
Sebagai ListView sederhana, ListView kustom juga menggunakan kelas Adapter yang menambahkan konten dari sumber data (seperti string array, array, database dll). Adaptor menjembatani data antara AdapterViews dan Tampilan lainnya.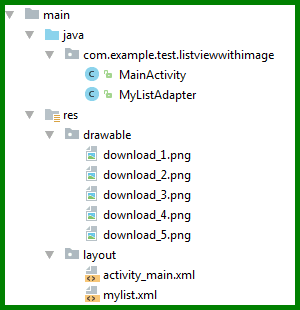
Buat file mylist.xml tambahan di folder tata letak yang berisi komponen tampilan yang ditampilkan dalam listview.
Tempatkan semua gambar yang diperlukan dalam folder drawable.
Sebagai ListView sederhana, ListView kustom juga menggunakan kelas Adapter yang menambahkan konten dari sumber data (seperti string array, array, database dll). Adaptor menjembatani data antara AdapterViews dan Tampilan lainnya.
Contoh Android Custom ListView
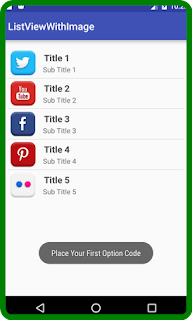
Dalam contoh listview kustom ini, kita menambahkan gambar, teks dengan judul dan sub-judulnya. Struktur proyek listview kustom
* activity_main.xml
Buat file activity_main.xml di folder layout. File : activity_main.xml<?xml version="1.0" encoding="utf-8"?> <RelativeLayout xmlns:android="http://schemas.android.com/apk/res/android" xmlns:tools="http://schemas.android.com/tools" android:layout_width="match_parent" android:layout_height="match_parent" android:paddingBottom="@dimen/activity_vertical_margin" android:paddingLeft="@dimen/activity_horizontal_margin" android:paddingRight="@dimen/activity_horizontal_margin" android:paddingTop="@dimen/activity_vertical_margin" tools:context="com.example.test.listviewwithimage.MainActivity"> <ListView android:id="@+id/list" android:layout_width="match_parent" android:layout_height="wrap_content" android:layout_marginBottom="50dp"> </ListView> </RelativeLayout>
Buat file mylist.xml tambahan di folder tata letak yang berisi komponen tampilan yang ditampilkan dalam listview.
* mylist.xml
File : mylist.xml<?xml version="1.0" encoding="utf-8"?> <LinearLayout xmlns:android="http://schemas.android.com/apk/res/android" android:layout_width="match_parent" android:layout_height="match_parent" android:orientation="horizontal" > <ImageView android:id="@+id/icon" android:layout_width="60dp" android:layout_height="60dp" android:padding="5dp" /> <LinearLayout android:layout_width="wrap_content" android:layout_height="wrap_content" android:orientation="vertical"> <TextView android:id="@+id/title" android:layout_width="wrap_content" android:layout_height="wrap_content" android:text="Medium Text" android:textStyle="bold" android:textAppearance="?android:attr/textAppearanceMedium" android:layout_marginLeft="10dp" android:layout_marginTop="5dp" android:padding="2dp" android:textColor="#4d4d4d" /> <TextView android:id="@+id/subtitle" android:layout_width="wrap_content" android:layout_height="wrap_content" android:text="TextView" android:layout_marginLeft="10dp"/> </LinearLayout> </LinearLayout>
Tempatkan semua gambar yang diperlukan dalam folder drawable.
* Activity class
File : MainActivity.javapackage com.example.test.listviewwithimage; import android.support.v7.app.AppCompatActivity; import android.os.Bundle; import android.view.View; import android.widget.AdapterView; import android.widget.ListView; import android.widget.Toast; public class MainActivity extends AppCompatActivity { ListView list; String[] maintitle ={ "Title 1","Title 2", "Title 3","Title 4", "Title 5", }; String[] subtitle ={ "Sub Title 1","Sub Title 2", "Sub Title 3","Sub Title 4", "Sub Title 5", }; Integer[] imgid={ R.drawable.download_1,R.drawable.download_2, R.drawable.download_3,R.drawable.download_4, R.drawable.download_5, }; @Override protected void onCreate(Bundle savedInstanceState) { super.onCreate(savedInstanceState); setContentView(R.layout.activity_main); MyListAdapter adapter=new MyListAdapter(this, maintitle, subtitle,imgid); list=(ListView)findViewById(R.id.list); list.setAdapter(adapter); list.setOnItemClickListener(new AdapterView.OnItemClickListener() { @Override public void onItemClick(AdapterView<?> parent, View view,int position, long id) { // TODO Auto-generated method stub if(position == 0) { //code specific to first list item Toast.makeText(getApplicationContext(),"Place Your First Option Code",Toast.LENGTH_SHORT).show(); } else if(position == 1) { //code specific to 2nd list item Toast.makeText(getApplicationContext(),"Place Your Second Option Code",Toast.LENGTH_SHORT).show(); } else if(position == 2) { Toast.makeText(getApplicationContext(),"Place Your Third Option Code",Toast.LENGTH_SHORT).show(); } else if(position == 3) { Toast.makeText(getApplicationContext(),"Place Your Forth Option Code",Toast.LENGTH_SHORT).show(); } else if(position == 4) { Toast.makeText(getApplicationContext(),"Place Your Fifth Option Code",Toast.LENGTH_SHORT).show(); } } }); } }
Menyesuaikan ListView
Buat kelas java lain MyListView.java yang memperluas kelas ArrayAdapter. Kelas ini menyesuaikan listview kami. File : MyListView.javapackage com.example.test.listviewwithimage; import android.app.Activity; import android.view.LayoutInflater; import android.view.View; import android.view.ViewGroup; import android.widget.ArrayAdapter; import android.widget.ImageView; import android.widget.TextView; public class MyListAdapter extends ArrayAdapter<String> { private final Activity context; private final String[] maintitle; private final String[] subtitle; private final Integer[] imgid; public MyListAdapter(Activity context, String[] maintitle,String[] subtitle, Integer[] imgid) { super(context, R.layout.mylist, maintitle); // TODO Auto-generated constructor stub this.context=context; this.maintitle=maintitle; this.subtitle=subtitle; this.imgid=imgid; } public View getView(int position,View view,ViewGroup parent) { LayoutInflater inflater=context.getLayoutInflater(); View rowView=inflater.inflate(R.layout.mylist, null,true); TextView titleText = (TextView) rowView.findViewById(R.id.title); ImageView imageView = (ImageView) rowView.findViewById(R.id.icon); TextView subtitleText = (TextView) rowView.findViewById(R.id.subtitle); titleText.setText(maintitle[position]); imageView.setImageResource(imgid[position]); subtitleText.setText(subtitle[position]); return rowView; }; }
Output :

0 Response to "Android Custom ListView (Menambahkan Gambar, sub-judul)"
Posting Komentar